Thursday 28 November 2013

ADVANCED TO CONTACT


This AAR is a play through of one of the new scenarios that will feature in our next book Sangin Despatches.

The battlefield


Overview:


As part of a big push into the green zone, your platoon has been ordered to advance to contact. Your platoon is to follow the canal north isolating and arresting the enemy. If that is not possible they may use lethal force against the insurgents.

Over the Bowman (British radio system), another platoon has a 5-meter contact and chases off the Taliban after a serious firefight. The Taliban retreat and are heading away from the battle, unfortunately right into the path of an ISAF blocking force.


ISAF Briefing


This game can be played as two individual battles with separate sections or one large battle.

ADDITIONAL RESOURCES:

On a roll 1-5 on a 1d10 off-table snipers may be deployed.


USMC Patrol


The USMC Patrol is based on the platoon attributes shown previously. 1 and 2 Section are each assigned a blocking task with the reserve being as shown below.


Let Battle begin

This was a battle between Pooch and I, Pooch had brought his USMC and I was fielding the Taliban. My small group only had one heavy weapon and RPG and came on the board running only to slow down to a walk when they realised all was not as it seemed.


The US moved to secure the high ground (building roof tops) and act as a blocking force to stop me getting off the board.


On the left side of the board the Taliban ran through the cornfield, only stopping as they reached the hedge.


The marines continue to move men into position while still trying to spot the Taliban. The Taliban are easier to spot as they are running but initially the US are failing their rolls. This is looking good.


Finally the dice gods show their sympathy and the US  spotting works and they open fire.


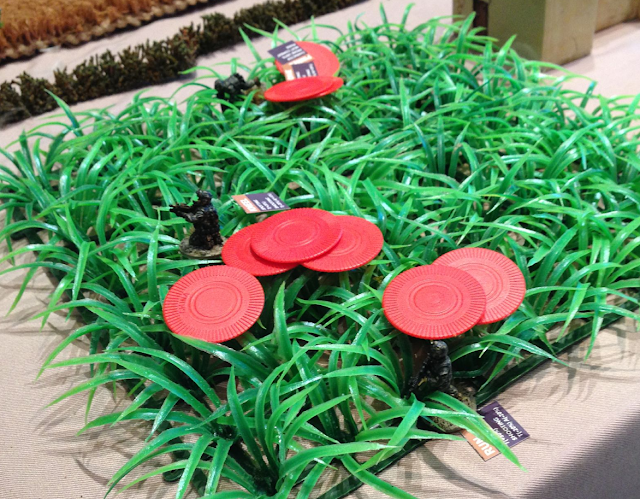
First casualty inflicted by the USMC.  The damage roll a 10. A badly wounded man. The Taliban next to him is left to take a morale test (red counter) having seen the effects of the American fire.


A Taliban and US 203 gunnar exchange gunfire through the hedge. He is too close to use the UGL.


The Taliban hit the American but roll double 1’s for damage, a disaster. The return fire scratches one Taliban. More marines drawn onto the board by the sound of gunfire.


Although the US have blockers in the way, the Taliban have to make a decision, to try and exit the board to gain points or fire their RPG… after a brief discussion Abdul and Abrahim make the decision to run and I believe I have two easy victory points.... but Pooch, always a crafty fighter, declares snap fire from his blockers. The two of them roll to hit taking the -30% for snap fire in account  and miss. Two Taliban victory point for me as my guys exit the board.


Meanwhile in the middle of the table a brief hand-to-hand battle starts but after several combat phases there can only be one decision, the marines superior skills win out. Scratch one Tally.


The US continue to man the building heights taking fire but the medium cover and kneeling saves them time and time again.


The Taliban move on the left and try to outflank the Americans.


On the right hand side the Taliban twins (They both have BODY 14), dig in and begin to give the advancing Americans a whole lot of hurt.


The battle rages with one of the Americans is taking hit after hit from multiple Taliban (Remember my earlier article about massing fire on one man, we'll it only works if Pooch stops making his 1d10+4 armour saves). His guy is slightly wounded but keeps bring the fight back to the Taliban.

All of those red markers each one give -10% to his morale after the first one and he still makes the roll. I think Pooch has John Rambo on his side.


The fighting gets down to some serious hand-to-hand. Pooch will do anything to stop the Taliban getting off the board.


At this point I could see the writing is on the wall for the Taliban, I  have managed to kill several Americans but can't get through them to get my victory points, I mean men, off the board.


Eventually numbers overwhelmed  the Taliban with this chap surrendering. he is quickly in the plasticuffs and is lead away.


In conclusion


It was a tough fight that early on seemed to be going all the Taliban’s way but then the slower Americans started to appear and block the bolt holes. The US defence slowed the Taliban advance by shear weight of fire. Eventually the Americans managed to grind out a win.

It was at this point we remembered that Pooch had rolled at the start of the game and got an off-table sniper, guess that sniper was kind of busy and missed all the excitment.


Saturday 23 November 2013

Shout out to Panzerfaust Nostalgia

This blog is worth reading, it has Sangin AAR plus heaps of cool stuff. He also shows you how he has painted our new Kiwi's that have just gone into production, but that's a different story.

Check it out here: http://panzerfaustnostalgia.blogspot.co.nz/


Force Creation Reference Sheet

To help speed up creating a new force we have created a Force Creation Reference Sheet. See the image below, these is also a link at the bottom of the page so you can download the PDF.

 It includes all the troop types and how to calculate their skills as well as what experience packages you can buy.


On page two it has a full list of the main weapons, they damage range and costs as well as the cost and protect provided by body armour and finally it shows the cost of vehicles and what assets are available to both ISAF and Insurgents and their associated costs.


You can download the PDF here

Friday 22 November 2013

Skirmish Sangin's Damage Dice Rationale


This blog post was inspired by a conversation with one of the Yahoo group members who was trying to work out the damage for weapons circa 1950.

In early drafts of Skirmish Sangin we looked initially at two types of weapon the AK47 and the M16A1/ L85A2/FAMAS and after careful consideration we gave them the following damage dice rolls:

AK47 2d10+4
M16A1/L85A2/FAMAS 2d10

As we play tested these very early basic rules, we decided to make all assault rifles 2d10. Why?

Well it speeded up the game and seemed to reflect all the reading and video watching we had, at that point, been watching like men possessed.  Once the rules moved out to the real world of players, its been accepted like many rules that use 1d6 for all small arms and add additional damage for support weapons (LMGs) etc.

From this decision we worked outwards adding the plethora of weapons used in the Afghan conflict. One of our key points from the beginning was to try and reflect modern weapons and tactics.

While watching one of the many soldier cam videos we came across images of an Afghan holding an old Lee Enfield .303 rifle. So when we added this weapon in to the mix we made its damage 3d10. 

Why I hear you ask again? Always with the questions :-)

Well modern assault rifles tend to be used in “Put some lead down range to keep their heads down” method often less politely called “Spray and Pray”.

automatic fire does not increase the burst hit probability beyond that of the single (first) round.

The bolt-action rifle is not, on the modern battlefield, used as an assault rifle. Its very nature makes the shooter selective and fire more carefully at the target. These shooters are not snipers, they are occasionally referred to, as marksmen or sharpshooters but they do tend to take aimed shots. An aimed shot, has a slightly higher chance of hitting somewhere nasty hence the increase to 3d10. We took this further with the snipers whom we gave 4d10 damage too, not because they use bigger cartridges (Although we did up the damage for the .50 cal Barret because it’s a monster) but more for the reason they are firing an aimed shot and choosing where to hit even more so than the marksmen.

Our aim was not to create a mathematically accurate representation of each type of round and to differentiate between each weapon but to create the feel of the modern battlefield with a set of rules that are simple to use.

Feedback so far from players across the globe, some of them who have actually served in paces like Afghanistan and Iraq is that we have a managed to do just that.

So why the post? Again with the questions :-)

 Well quite a few people are using the Skirmish Sangin engine to play there favourite post ww2 battles and we thought if you can understand the logic of our decisions it will help you in your conversions.

If you converting the rules to your favourite period do let us know as we would love to hear what you are doing and how.

On a related note, so far in are WW2 rules play-testing we have downgraded rifles to 2d10 as many more troops used bolt-action weapons and did so in a more “5 rounds of rapid-fire now” approach. The average dice roll of 3d10 is 16.5, so to increase casualties we are considering downgrading bolt-action rifles 2d10. As the lack of Body Armour in WW2 makes 3d10 almost always a kill shot. So the damage is assigned to create the feel of the era not really representative of the calibre of the round.

M18A1 Claymore Mine


Cost: 25pts

The M18A1 is a primarily a defence weapon that is a directional fragmentation mine. The mine is loaded with 700+ steel balls and backed by 0.68kg of composition C4 explosive.

The claymore propels a fan shaped pattern of steel balls in a 60-degree arc to a maximum height of 2 meters and has a kill zone of 50 metres and a casualty zone of 100 metres. The back blast is unsafe in exposed areas to 15 metres (see template).

Front 60-degree horizontal Cone:
Kill Zone (KZ) 50m (25”) 4d10, PEN 4
Damage Zone (DZ) 55m (27.5”) 1d10

Rear Damage Zone:
Damage Zone (DZ) 55m (27.5”) 1d10

Claymore Mine Template


Tuesday 19 November 2013

Winning games the Insurgent way


When we wrote SKIRMISH SANGIN we looked in detail at the Taliban (Insurgents) and the tactics used by them. All insurgents around the world soon realise they cannot win a battle toe-to-toe with military forces. Modern military forces have air power, usually superior quality and quantity of weapons and greater discipline than insurgent forces. On paper the insurgent should never win.


So what do Insurgents need to do to win Skirmish Sangin games?


Well to answer that you need to look at the one major weakness of the modern military forces, this is their inability to take casualties.

Each casualty is a potential victory for the Taliban and we recommend you use the optional rules, that when ISAF take casualties the ISAF mission changes to Medevac’ing the wounded.

If you are using the point system and we recommend try using it and not using it and seeing what difference you see in the game. I mainly game without it.

As Taliban you will be aware that you will have no Elites probably few if any Veterans and while you will have Average experienced troops, the majority of your units will be Novices. They have low morale and low weapons skill. So how can they dominate?


Here are a few ideas:
  1. When you first roll the BODY attribute your unit will have a range of values form 11 to 20, start by partnering individuals that have the same or similar BODY attributes. Keep these teams together as long as you can.
  2. The strongest tactic for a weaker force is to group your fire on individuals. While you hit less often, even missing in SKIRMISH SANGIN causes a morale check, the more fire the enemy takes, the more morale markers you can stack and each one, after the first, is -10% to their morale roll.
  3. Keep a number of team members together. Novice characters only have a 35% morale test but for each friendly within 6” they gain + 10% to a max of 30%. A group of three Novice Taliban give +20% on their morale rolls. This makes the Novices morale 55% the same as an Average Taliban.
  4. Makes sure you spend your last AP each round kneeling down. It’s so much more difficult to hit a kneeling character.
  5. Make the best use of the cover you have, NEVER ever be in the open, do not risk that run you hope to pull off, having few characters on the table means your opponent will see everything you do.
  6. Read the snap fire rules carefully, snap fire is your friend.
  7. Take as many RPG's as you can afford, RPG's cause lots of damage and morale rolls (-30%) even when they miss and you will frequently miss with Novice characters but if you can put multiple rounds against the enemy your chances of wounded them and causing morale rolls grows significantly. Also remember the burst diameters are 15” so their effect area is about as large as they come.
  8. IED’s – This weapon is cheap and powerful, if you are using the points system you don’t even have to tell the opposition player before the activate. But please make sure you have marked them clearly on a sketch map first.
  9. In larger games buy the off table mortar team, in smaller games make sure you take at least one off the table Snipers and remember to use them. You will be surprised how many people buy them and then forget to use them.
So there are just a few ideas of what you can do to better use you Taliban force. If you have any other ideas why not drop us a line.


Saturday 16 November 2013

The hammer and the anvil - SKIRMISH SANGIN AAR


After Action Report

Mission

Elements of the French Foreign Legion supported by US Marines carry out a dawn raid on a known Taliban stronghold. The French are the hammer and the USMC the anvil, that ISAF hopes the Taliban are caught between.

Squad 1 French foreign legionnaires move into ambush position on Taliban village


The Taliban Technical crew suspect nothing and as they have no LoS. The Taliban are not active this phase so don’t move.


The legion begin their attack


 The sound of gunfire alerts the village and the Taliban become active.


The second legionnaire squad activates and begins their attack on the east side of the village.


 The Taliban heavy weapon begins to fire at the French. The French are temporary pinned down.


The second squad decides to try and enter the compound.


Additional support moves into the area.


The support squad makes a successful entry and the Minimi opens up on Taliban appearing from the village.


 The Taliban are pinned.


The US support squad arrives and moves in from the rear.


The Taliban take the battle to the Americans, hand-to-hand style. The battle for the compound is long and bloody…

Overwhelmed and out numbered the battle soon goes against the Taliban as they are either killed or routed out of the village. The three-pronged attack was too much to resist. This game took just over an hour.

WELCOME TO THE ALL NEW SKIRMISH SANGIN BLOG


Doesn't time fly, when yo are having fun. We launched SKIRMISH SANGIN on 1st January 2013 and what an exciting last eleven months its has been.

We have demoed games at Call to Arms(WLG) NZ Nationals (WLG), and CONQUEST (CHCH) this year and hope to do much more next year.

We have met and played games with some terrific people who have made writing and playing this games a huge amount of fun.

Full production our our first 16 Kiwi/Australian 28mm figures has now began with sculpting by the eBob and production by the excellent Eureka Miniatures.


Unfortunately its not been all laughs, with major illness pushing production back, we have delivered less to you the fans than we would like. In a hopes to rectify this, we are about to release SANGIN DESPATCHES No.1. The first of our planned support books that at this stage contains 8 different scenarios, 4 ORBATS and numerous articles on strategy and tactics of the modern battlefield. All written by real soldiers, so we are getting the information right from the horses mouth so to speak. We are just waiting for the photography and then its good to go.


So its fair to say things are alive and jumping in the SANGIN camp and now we launch our blog in an effort to help support the community even more. So we would like to thank everybody who has helped, especially those of you who have, or are currently, serving in the armed forces around the world and who took the time to write to us and tell us how much you like the game as well as offering us much support and additional information.

cheers
Colin